


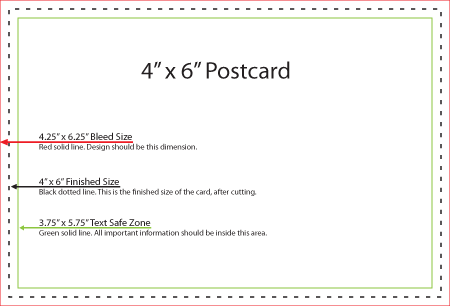
The above image is a basic template of guidelines for setting up a job with bleeds (in this case, a 4″ x 6″ postcard). Click image to open a PDF of the document.
More and more our clients are designing their jobs to bleed. What is a bleed? In printing, a bleed is any part of the design that goes right to edge of the finished piece. Most presses/printers do not allow for printing all the way to the edge of a sheet of paper, so to create a bleed the design must be made larger than the desired finished size and the paper must be cut down after printing. For CEC’s digital presses at least an eighth of an inch (1/8″ or 0.125″) bleed is required to create this effect. So if you’re setting up a post card that is 4″ x 6″ finished size that bleeds on all 4 edges, you’d actually have to create an image that is at least 4.25″ x 6.25″.
 |
 |
| Incorrect document setup (bleeds not extended) | Correct document setup (bleeds extend 0.125″ beyond page border) |
| Click the above images to open a larger version in a new tab/window. | |
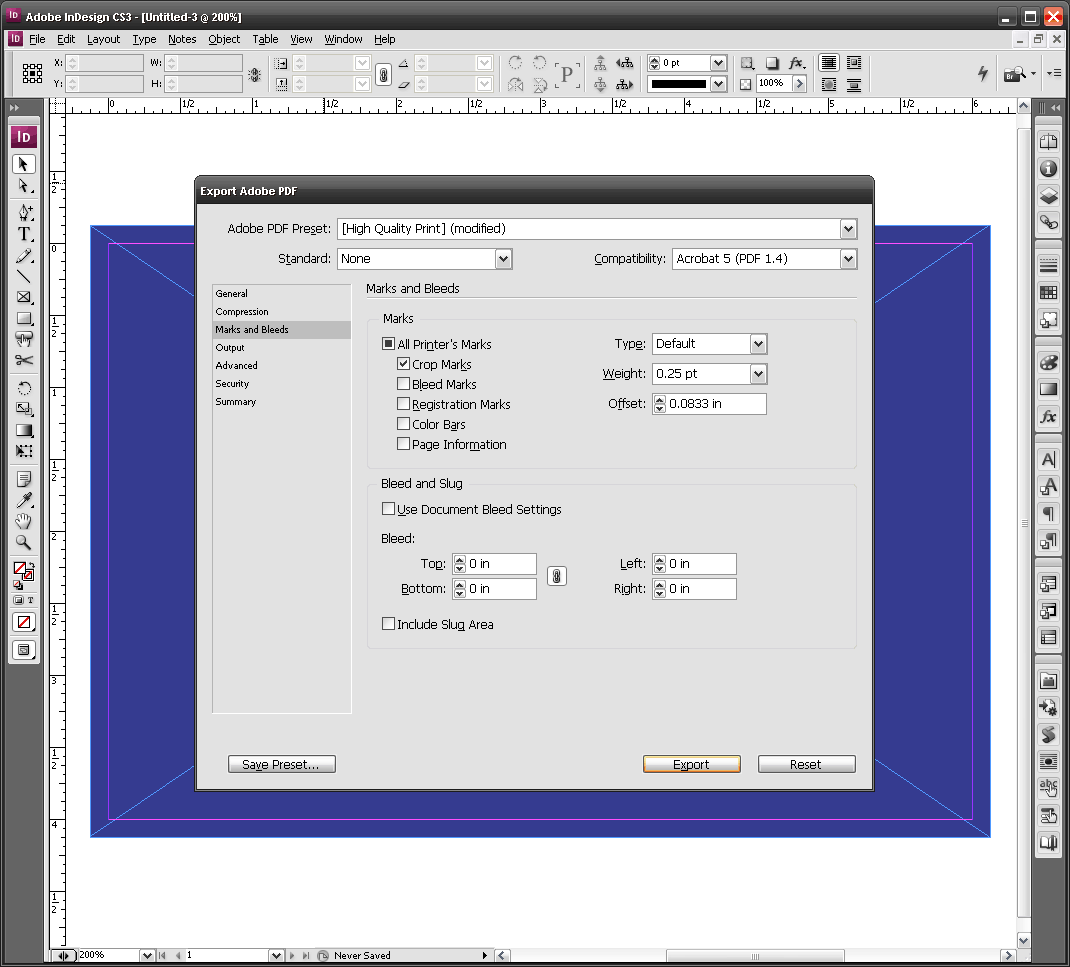
A common issue that we run into is that the native file (InDesign, Quark, Illustrator, etc…) was set up properly but when the file arrives to us in PDF format, the bleeds are not there. Sometimes the document will have crop marks outside of the finished size but the image ends right at those crop marks rather than extending beyond. This typically means that when the PDF was created there was an option left unchecked or not set up correctly. Bleeds must be turned on and you must be sure to include at least 1/8″ for each dimension. In Adobe applications, in the PDF output settings window under the “Marks and Bleeds” section, make sure the boxes in the “Bleeds” area don’t read “0 in”. In Quark, in the “Output” tab in the “Bleeds” section, select “Symmetrical”. Again, at least an eighth of an inch (1/8″ or 0.125″) is required for each edge. Below is an example of the incorrect settings and results using Adobe InDesign CS3.
 |
 |
| Incorrect PDF output bleed settings (bleeds are set to “0 in”) | How the resulting PDF file looks |
| Click the above images to open a larger version in a new tab/window. | |
When these settings (above left) are used, the bleeds will not be present in the resulting PDF file(above right) even though the bleeds are clearly extended in the native document.
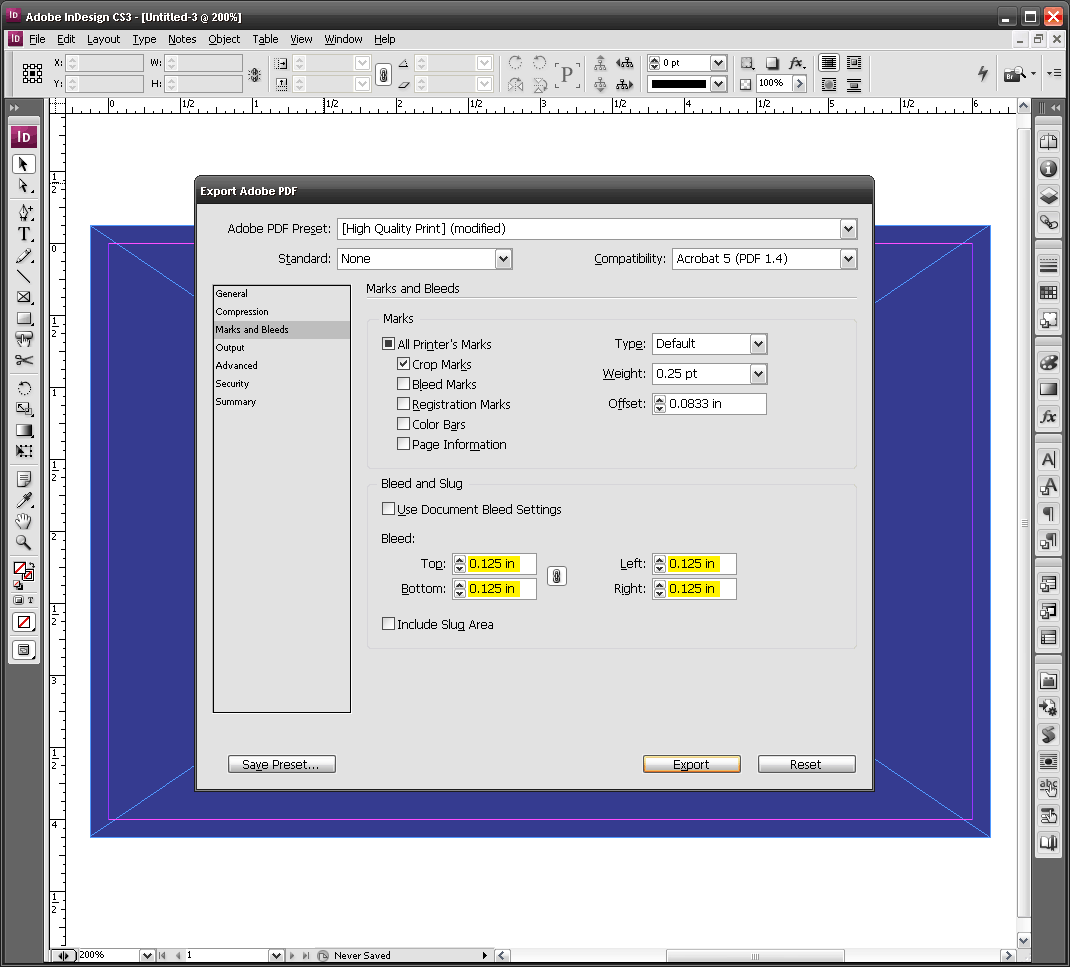
Below are the corrected output settings (left) and the resulting PDF (right). Note that in the PDF (below right), the crop marks overlap a portion of the color background whereas in the example above (right), the crop marks line up exactly with the edge of the color background.
 |
 |
| Correct PDF output bleed settings (bleeds are set to “0.125 in”) | How the resulting PDF file looks |
| Click the above images to open a larger version in a new tab/window. | |
And what about Microsoft Word or Publisher? Professional design applications like Adobe InDesign and Quark Xpress allow you to create your document at the correct finished size but then extend graphics beyond that size and still include them in the output as bleeds. Microsoft’s Office Suite does not handle this well. While Publisher does have a setting to “Allow Bleeds”, it doesn’t work the way most users expect it to. It is best to create your actual page/document size to be larger than your desired finished size. So as mentioned above, if you’re creating a 4″ x 6″ postcard, your file in Word/Publisher should be 4.25″ x 6.25″. It is important to keep in mind though that the only things outside the 4″ x 6″ area are items you do not want on the finished piece. Always keep important text and photos inside the desired finished area. The safe measurement is an eighth of an inch inside the 4″ x 6″ space – so 3.75″ x 5.75″. This “Text Safe Zone” applies to any application you use.
 |
 |
| 4″ x 6″ postcard setup with bleeds in Microsoft Word | 4″ x 6″ postcard setup with bleeds in Microsoft Publisher |
| Click the above images to open a larger version in a new tab/window. | |
While this example has covered a specific size postcard, the rules are the same for any size output you may be printing with CEC:
- Extend bleeds on each edge 1/8″ beyond the finished size
- Keep all important information 1/8″ inside all of the finished boundaries to make sure nothing important gets cut off.
By following these guidelines when submitting files to CEC you can shave some time off of the proofing process and ensure that your final printed piece will look as you expect it to.
For more digital printing questions, please check our Knowledge page, previous blogs, or contact us directly.