


In a previous blog we covered a couple of free methods to create a PDF for printing at CEC. In this update we’re going to address a very common issue when digitally printing PDF files.
Have you ever received a print with a white box behind text where you were expecting a dropshadow over a solid color? This usually means that one of the solid colors involved is a spot color. The problem most frequently occurs when creating PDF files from Adobe Illustrator or InDesign, but it happens with other design packages as well.
Below is an example of the problem and a solution we’ll cover.

How the graphic looks on screen. There is little to no difference between the spot color graphic and the process color graphic.

When printed, a white box appears when spot colors are used. The process colors maintain the desired look.
It is important to note that “transparency” in this case does not strictly refer to the opacity setting of an object. This problem most frequently occurs when using the “Dropshadow” effect within InDesign or Illustrator. This effect may or may not involve the “opacity” setting for the effected object. The blending mode used to create the effect (often “multiply”) takes into account the color under the shadow – thus making the shadow “transparent”.
As with most problems, there are multiple solutions. The two that we will address here are the most dependable methods for CEC’s printing process. The methods described below can work individually, but when both methods are combined it will almost always eliminate this problem completely. We will focus on Adobe InDesign CS3 and Adobe Illustrator CS3 as those are the applications from which we usually encounter these issues. The methods are the same for other applications, but the steps or wording may be slightly different.
Method 1: Convert spot colors to CMYK process builds.
This is the most dependable fix. Convert the colors that come into contact with the transparency objects for sure. But for the sake of consistency, it is recommended to simply change the color in your swatch palette from “Spot” to “Process”, thus changing all instances of the colors in the document. To do this, open your swatches palette (Window > Swatches) and double click the spot color to be converted. Then change “Color Mode” to CMYK and “Color Type” to Process.
Here’s how to distinguish spot colors and process colors in the InDesign and Illustrator swatch palettes:
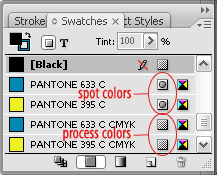
In InDesign’s swatch palette, the square with a gray circle in it represents a spot color
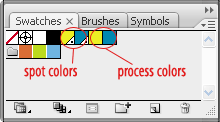
Spot colors and process builds as they appear in Illustrator’s swatch palette. Note the white triangle with a black dot which appears on spot color swatches.
Method 2: Export to a PDF with /X-3 Compatibility.
Saving As or Exporting to a PDF (as opposed to printing to a PDF) out of applications that allow for it is generally the best route. Using the /X-3 standard in the PDF setup is preferred as it will flatten transparencies, yet still allow CEC to do some editing if necessary. In the event that flattening transparencies is not possible in the file you’re exporting, having the /X-3 standard selected will give you a warning so you know you need to convert spot colors in the document before creating a PDF. The steps are virtually identical between InDesign and Illustrator.
In InDesign, go to File > Export. Select a location, name the file and make sure to select “Adobe PDF” for “Save as Type” and click “Save”.
The window below will open. In addition to the usual settings (crop marks, bleeds, embed fonts, etc…) you’ll want to select “PDF/X-3:2003” as the Standard.
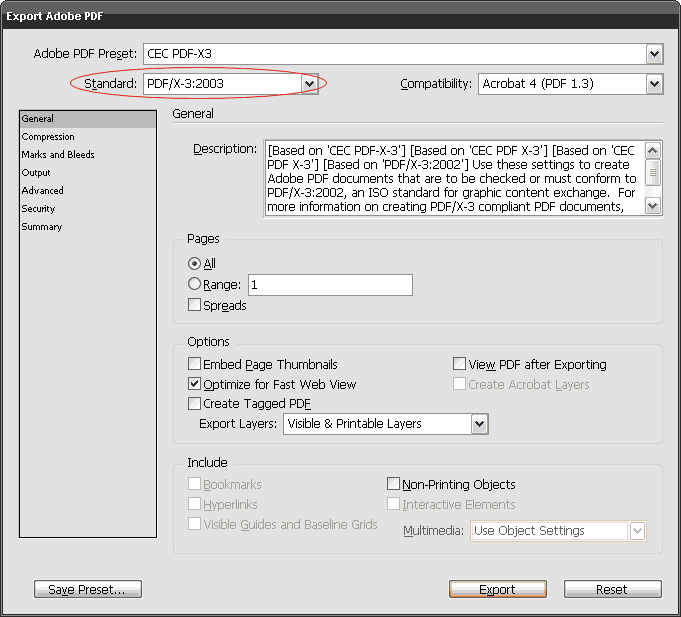
Exporting from InDesign: select the “PDF/X-3:2003” standard (circled in red). Click the image to open a larger version in a new tab/window.
In Illustrator, go to File > Save As. Select a location, name the file and make sure to select “Adobe PDF” for “Save as Type” and click “Save”.
That will bring up the screen below. Set up the options as you normally would for a high-quality print file, but also change the Standard to “PDF/X-3:2003”.
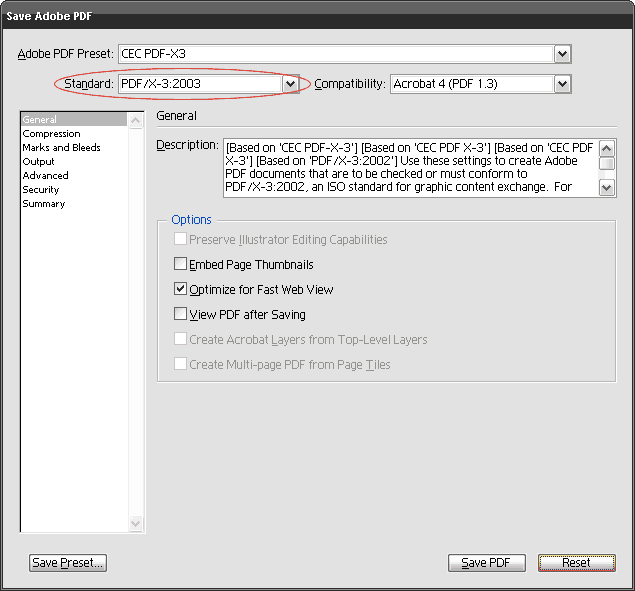
Save As from Illustrator: select the “PDF/X-3:2003” standard (circled in red). Click the image to open a larger version in a new tab/window.
To save time, you can also download and install CEC’s PDF job options file, then all you have to do when saving or exporting to a PDF out of Adobe software is select “CEC PDF-X3” as the Adobe PDF Preset.
Finally, regardless of how it was created, or what application you created it with, it is always a good practice to view your newly created PDF file to make sure everything saved the way you expected it to. Hours of proofing time can be saved if you know the file looks right before sending it to us.
We hope this helps you avoid some of the common problems associated with creating PDFs for printing at CEC. If you ever have any questions about setting up a file, do no hesitate to contact us. You can also view our previous blogs and Knowledge page for more tips.