


Variable data printing is often mistaken for a simple mail merge. However, it can be much more unique than that. One specific type of variable data printing – variable image printing – allows for focused graphics to be used within each and every piece in a single project. This subject was touched on in one of our previous posts, but now we’ll focus on how CEC sets up a document for variable data and image printing.
For example, let’s say we’re printing a flyer and we’ll assume that data was collected from clients pertaining to their favorite color. So our data file – a comma delimited text file (.CSV) – looks like this:
| ContactFirst | ContactLast | Address | City | St | Zip | Color |
|---|---|---|---|---|---|---|
| Tom | Smith | 123 First St | Denver | CO | 80239 | red |
| John | Jenkins | 456 Second Ave | Boulder | CO | 80301 | blue |
| Sue | Jones | 901 Other Ln | Denver | CO | 80206 | green |
In this case, we would also have to set up the following items:
1) A template for the flyer layout including all static (ie…non-variable) graphics.
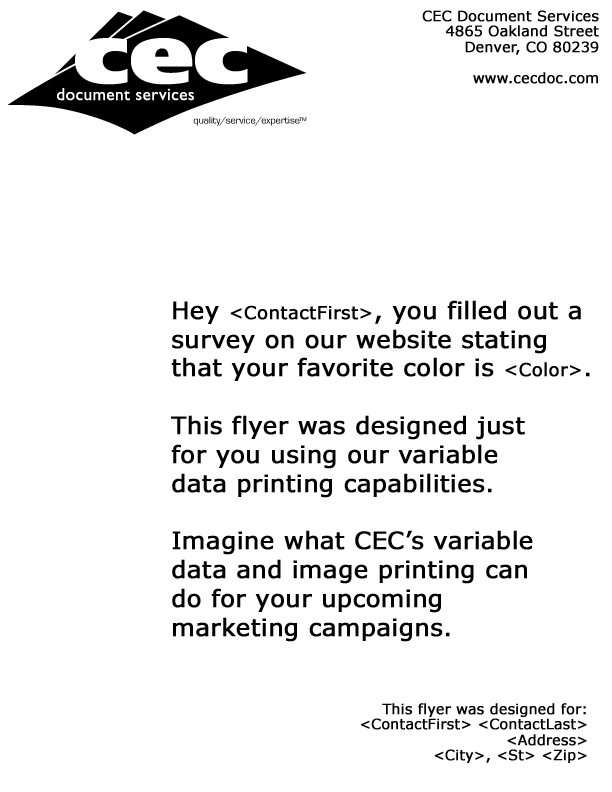 The Variable Master File (Left. Click to open a larger version in another tab/window.) is basically the way you want your flyer to look, minus the variable images. Don’t be scared off by the variable names (indicated with < >) in the image at left. Basically, the file you send to CEC would be the same as any non-variable flyer job you would send to us. All you need to do beyond that is provide us with a data file and images to be variably added and indicate to us which parts of the piece will be variable (usually names, addresses, salutations, images, etc…) and we’ll handle the setup from there.
2) Also needed are the graphics for the flyer background that will change based on the information in the “Color” field in our data file. Based on the data above, three images are needed.
 |
 |
 |
| red.tif | blue.tif | green.tif |
| Click the above images to open a larger version in a new tab/window. | ||
(the above images are actually .png files for web viewing. Typically for printing, they would be TIF files, as named in the captions above and in the following paragraph)
It is important to note that the files here (in the above example, TIF images) are named according to their corresponding value in the data file. The “.tif” extension is referenced when we’re setting up the rules in the Variable Master File. However, for the variable data to work correctly, the word in the “Color” field of the data file must match exactly to the name of the image being variably dropped in. If we had an image named “green1.tif”, it would not get used because the “Color” field in the data file only has information for “red”, “blue”, and “green”. Conversely, if the “Color” field contained “purple” for a record but there was no “purple.tif” created, then the resulting output file for that record would have a blank white background similar to the “Variable Master File” image shown above.
When these items are combined and the final files are output they will look like this:
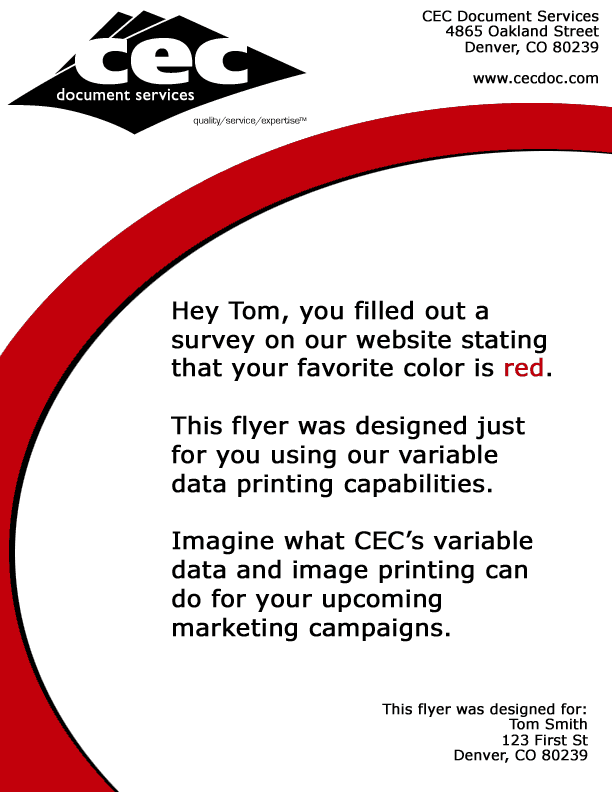 |
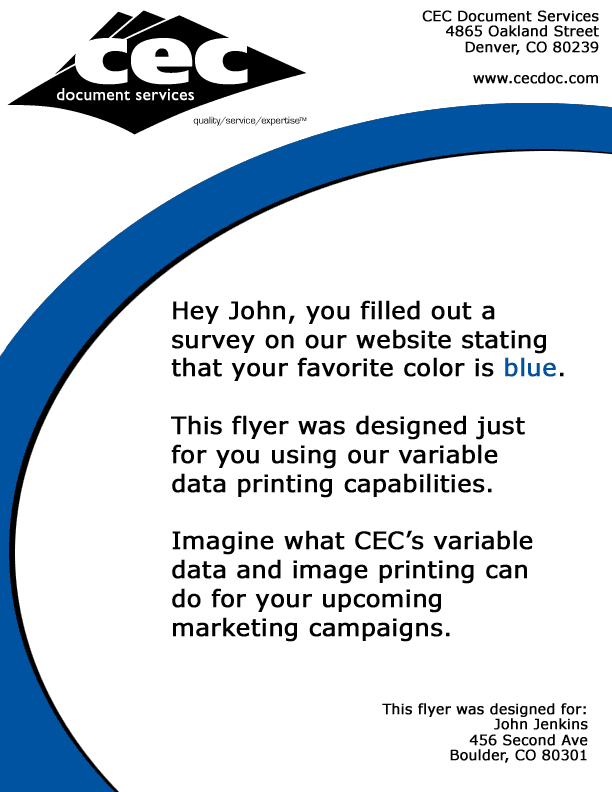 |
 |
| Record01.pdf | Record02.pdf | Record03.pdf |
| Click the above images to open a larger version in a new tab/window. | ||
Notice that not only does the “swoosh” graphic change based on the “Color” field, but the color of the “Color” text in the body of the flyer changes as well. This is another simple rule that we can set up in our Variable Master File to change the font color based on the information in the “Color” field of the data file.
This has been an admittedly simple example of variable data and variable image printing, but hopefully this helps you visualize some of the possible applications within your marketing needs. If you have any specific questions regarding variable data or variable image printing, please do not hesitate to comment below or contact us. We’d love to offer our expertise to personalize your next campaign.